#sq($account.defaultName)#
#sq($account.personalInfo.userName)#)
U can use this to show the login in the report or you might want to filter the report based on the login.
Filter: [LOGINCODE] = lower(#sq($account.personalInfo.userName)#)
Now only records with the report users login are shown.
Friday, September 27, 2013


Wednesday, June 20, 2012
Recover your stolen phone, tablet and computer with Prey
Prey is free open source software that lets you keep track of your device whenever its stolen or missing. It works on Ubuntu, Debian, Mac OS, Linux, Android, i OS and Windows.
If you check in the site and set your device to stolen the device will send a Google map with the location of the device (Even if there is no GPS in the device!), a screenshot, a webcam picture, network info like ip adress and the name of the wifi connection.
I tested this on Ubuntu 12.4 LTS (32 bit) and Ubuntu 18.04.5 LTS (32 bit) and it works great. (After a bit of tweaking.)
The current version in the repository does not work as the directories are changed in 12.4 LTE.
To make it work in Ubuntu 12.4 download the .deb file from http://preyproject.com/download. Install the .deb file and register yourself and the device at the prey website.
If you check in the site and set your device to stolen the device will send a Google map with the location of the device (Even if there is no GPS in the device!), a screenshot, a webcam picture, network info like ip adress and the name of the wifi connection.
I tested this on Ubuntu 12.4 LTS (32 bit) and Ubuntu 18.04.5 LTS (32 bit) and it works great. (After a bit of tweaking.)
The current version in the repository does not work as the directories are changed in 12.4 LTE.
To make it work in Ubuntu 12.4 download the .deb file from http://preyproject.com/download. Install the .deb file and register yourself and the device at the prey website.
There is an old version of Prey in the Ubuntu 18 repository that can be installed with: sudo apt install prey.
Do this then purge the install with: sudo apt purge prey.
Better to download the latest .deb file from the prey website and run:
Now check and if needed edit /etc/prey/config or /etc/prey/prey.conf and add the device key and API key which can both be found at the prey website under settings>about.
The API key is on the account page, the device key is at the device page.
This can also be done command line:
sudo /usr/lib/prey/current//bin/prey config account authorize -a -e email@adress -p preypassword
I had to do a reboot to get it running properly.
sudo dpkg -i prey_1.9.6_i386.deb
Prey resides in: /usr/lib/prey
Open the GUI with: sudo /usr/lib/prey/current/bin/prey config gui -f
try: sudo /usr/lib/prey/current//bin/prey -h
and try: sudo /usr/lib/prey/current//bin/prey config check
The API key is on the account page, the device key is at the device page.
This can also be done command line:
sudo /usr/lib/prey/current//bin/prey config account authorize -a -e email@adress -p preypassword
I had to do a reboot to get it running properly.
Prey uses systemd and if installed correctly creates prey-agent.service
Check status with: sudo systemctl status prey-agent.service
Optional detail filter in cognos report.
Create a valueprompt with 3 static Choices that give parameter ?PromptParameter? one of these values: allmissing, 1of2missing or nonemissing.
Choosing 1 of these 3 options results in a filter being used.
Only one detail filter is used. Remember, a detail filter can only be true or false.
Detail Filter:
There is another possibility not to use this filter but to add 3 dataitems that only count the data that is wanted. Then create 3 lists and make them conditional, but I like this "hack" better.
This way there is only one report with one list with one filter to maintain.
I like to do these things KISS ( Keep It Simple Stupid). KISS things are easy to maintain, easy to understand, easy to change, easy to explain and therefore highly efficient.
Please try to do these complicated things KISS. (As I learned from my Elmer.)
Choosing 1 of these 3 options results in a filter being used.
Only one detail filter is used. Remember, a detail filter can only be true or false.
Detail Filter:
(  ?PromptParameter? = 'allmissing'

and  [Data1] is missing

and  [Data2] is missing)


or


(   ?PromptParameter? = '1of2missing'

and

(   [Data1] is not missing

or [Data2] is not missing))


or


(   ?PromptParameter? = 'nonemissing')
There is another possibility not to use this filter but to add 3 dataitems that only count the data that is wanted. Then create 3 lists and make them conditional, but I like this "hack" better.
This way there is only one report with one list with one filter to maintain.
I like to do these things KISS ( Keep It Simple Stupid). KISS things are easy to maintain, easy to understand, easy to change, easy to explain and therefore highly efficient.
Please try to do these complicated things KISS. (As I learned from my Elmer.)
Tuesday, May 24, 2011
How to wireless problem on the Asus EEE PC 1000L with Ubuntu 11
It seems that with every new version of Ubuntu there is a problem with the wireless card and its drivers on the Asus EEE PC 1000L. The card in the Asus EEE PC 1000L is a Ralink RT2860.
(To check if this card is in your system type 'lspci')
After installing Ubuntu 11.04 Natty Narwhal it seems to work but after a reboot the connection cannot be made or the system tries to reconnect every minute or so.
Installing 'wifi radar' helps (Dont know why.) but the connection is not stable.
The solution is to add 2 lines to: /etc/modprobe.d/blacklist.conf
Do a reboot and 11.04 is fine.
After upgrading to Ubuntu 11.10 the network is again gone.
The solution is to add the following line to: /etc/modules
Do a reboot and 11.10 is fine again for about six months.
(To check if this card is in your system type 'lspci')
After installing Ubuntu 11.04 Natty Narwhal it seems to work but after a reboot the connection cannot be made or the system tries to reconnect every minute or so.
Installing 'wifi radar' helps (Dont know why.) but the connection is not stable.
The solution is to add 2 lines to: /etc/modprobe.d/blacklist.conf
blacklist rt2800pci

blacklist rt2x00pci
Do a reboot and 11.04 is fine.
After upgrading to Ubuntu 11.10 the network is again gone.
The solution is to add the following line to: /etc/modules
rt2800pci
Do a reboot and 11.10 is fine again for about six months.
Friday, February 25, 2011
How to count only certain data in Cognos Report Studio?
Sometimes a count needs to be made on data that needs to meet certain requirements.
There are several
Example 1:
Example 2:
Put either of these in a 'data-item'.
You can now use it in a list and do a Total on it.
There are several
Example 1:
COUNT ( IF ( [FrameworkField] <= 2700 ) THEN (1) ELSE (0) ) Example 2:
CASE WHEN ( [FrameworkField] <= 2700 ) THEN (1) ELSE (0) ENDPut either of these in a 'data-item'.
You can now use it in a list and do a Total on it.
Tuesday, February 15, 2011
How to strip the time from a date_time in Cognos Report Studio
Edit the definition of the date/time field in Framework Manager.
cast( [field in framework] as DATE )
Thursday, December 09, 2010
Cognos Report Studio: How to replace '1' and '0' with 'Yes' and 'No'
If you need to replace the values '1' and '0' with 'Yes' and 'No' in Cognos Report Studio you will need to add a new Data Item with an Expression Definition.
- Open the report in Cognos Report Studio and open the query in the query explorer.

- Add a new Data Item and use as Expression Definition:
- Now open the page explorer and add the Data Item as a column. You will now see a list containing Yes and No values.
- Open the report in Cognos Report Studio and open the query in the query explorer.

- Add a new Data Item and use as Expression Definition:
if([Databasefield] <> '1')
then ('No')
else
('Yes')
- Now open the page explorer and add the Data Item as a column. You will now see a list containing Yes and No values.
Wednesday, August 18, 2010

Wednesday, May 12, 2010
Midnight commander on Ubuntu server 8.04 LTE
Midnight Commander is not present after the initial install of Ubuntu server 8.04 LTE. Also installing with
To install MC you will need to install a key and add a repository.
To install the key type in terminal:
To add the extra repository edit /etc/apt/sources.list and add the following two lines:
(As editor nano could be used.)
Now update with:
Midnight Commander can now be installed with:
sudo apt-get install mc does not work.To install MC you will need to install a key and add a repository.
To install the key type in terminal:
sudo apt-key adv --keyserver keyserver.ubuntu.com --recv-keys F82FBD49To add the extra repository edit /etc/apt/sources.list and add the following two lines:
deb http://ppa.launchpad.net/zyv/ppa/ubuntu YOUR_DISTRO main

deb-src http://ppa.launchpad.net/zyv/ppa/ubuntu YOUR_DISTRO main
(As editor nano could be used.)
Now update with:
sudo apt-get updateMidnight Commander can now be installed with:
sudo apt-get install mc
Friday, April 16, 2010
Huawei E180 HSPA dongle on Ubuntu 9.10 Netbook Remix
There are many ways to do it wrong and this is the correct procedure to get a working Huawei E180 HSPA dongle with your Ubuntu 9.10 Netbook Remix netbook.
- Insert the dongle, then turn on the computer.
- Right-click the network icon and go to Edit Connections.
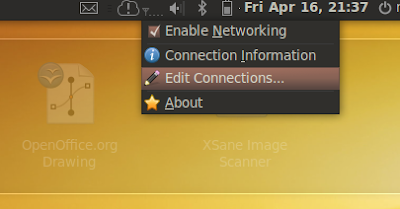
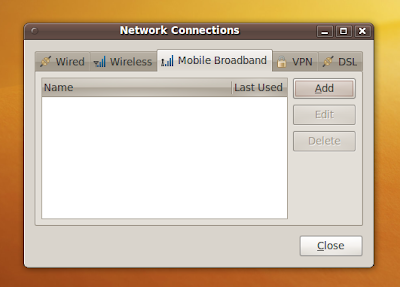
- Select Mobile Broadband Connection and click Add to set up a new Mobile Broadband Connection.
- The dongle is recognised as HUAWEI Technology HUAWEI Mobile, just press Forward.
- A country list appears, choose Netherlands and press Forward.
- A provider list appears, I tested with KPN Mobile and press Forward.
- A billing plan has to be chosen but there is only the Default choice, just press Forward.
- A resume of the settings appear, just press Apply.
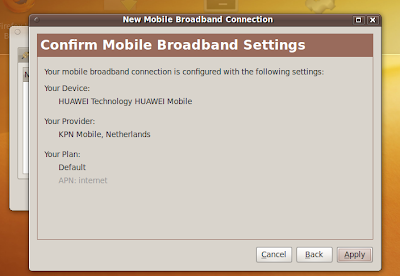
- A settings screen appears, don't change anything just press Apply.
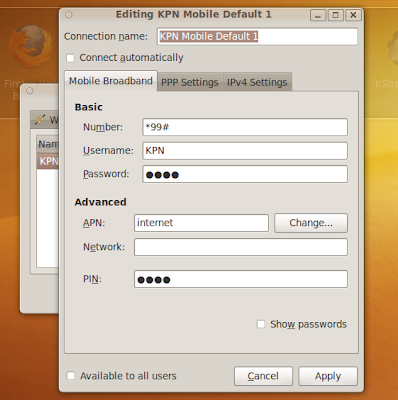
Now everything is set up.
- Click the network icon and click the Mobile Broadband called KPN Mobile Default 1
- A PIN is needed. (Only once during install) Give the correct PIN and press enter. (The PIN is saved.)
Wait a few seconds and you have internet.
No extra drivers or software need to be installed and everything works out of the box.
- Insert the dongle, then turn on the computer.
- Right-click the network icon and go to Edit Connections.

- Select Mobile Broadband Connection and click Add to set up a new Mobile Broadband Connection.

- The dongle is recognised as HUAWEI Technology HUAWEI Mobile, just press Forward.
- A country list appears, choose Netherlands and press Forward.
- A provider list appears, I tested with KPN Mobile and press Forward.
- A billing plan has to be chosen but there is only the Default choice, just press Forward.
- A resume of the settings appear, just press Apply.

- A settings screen appears, don't change anything just press Apply.

Now everything is set up.
- Click the network icon and click the Mobile Broadband called KPN Mobile Default 1
- A PIN is needed. (Only once during install) Give the correct PIN and press enter. (The PIN is saved.)
Wait a few seconds and you have internet.
No extra drivers or software need to be installed and everything works out of the box.
Saturday, October 31, 2009
Maxtor 6L250R0 234 GB (30515 Cyl 255 H 63 Sec)
I have this Hard disk that I need for an old MS-DOS system.
No support site, no sticker on the drive.
Finally after a long search.
Google saves the day and points me to a backup of a logfile deep in the sediments of the interwebs. I found an old logfile.txt and from it I could extract the needed data.
Maxtor 6L250R0 234 GB
IDE Name: Maxtor 6L250R0
Kind of drive: Physical drive 250GB Capacity, UDMA/133, 7200RPM, 16MB Cache, 3.5in Hard Drive, 8.5 ms average seek time, 4.17 ms average latency, IDE interface.
Geometry: 30515 Cylinders * 255 Heads * 63 Sectors
LBA sectors: 490,223,475 (234 GB)
Kind of access: LBA mode
Monday, July 06, 2009
Citrix ICA client on Ubuntu 9.04

1 Go to: http://www.citrix.com to download and install the linux ICA client/Citrix Receiver.
(http://www.citrix.com/English/ss/downloads/details.asp?downloadId=3323&productId=186&c1=sot2755&c2=ost1349860)
Run setupwfc.
2 Install usertrust certificate.
(Needed by the ICA client for encryption of the ICA stream.)
Copy http://www.usertrust.com/cacerts/UTN-USERFirst-Hardware.crt to ./usr/lib/ICAClient/keystore/cacerts/ or ./home/#username#/ICAClient/keystore/cacerts/
Run in terminal:
wget http://www.usertrust.com/cacerts/UTN-USERFirst-Hardware.crt -O ./usr/lib/ICAClient/keystore/cacerts/3 Workaround for Program neighbourhood manager bug.
Run in terminal:
sudo apt-get install libmotif3
cd /usr/lib
sudo ln -s libXm.so.3 libXm.so.4

4 Reboot
Run in terminal:
reboot5 Configure the ICA client/Citrix Receiver.
Start Citrix Receiver and go to Connection > Propperties > Connection and choose 128 bit Encryption Level.
Monday, April 20, 2009
(K)ubuntu 8.04 on the HP Mini 2133 (FU338EA)

Finally the screen problems are solved.
Here is how I finally got the HP Mini 2133 (FU338EA) working correctly with kubuntu.
First install kubuntu-8.04.2-desktop-i386.iso
Then install the VIA video driver.
Browse to http://linux.via.com.tw/support/downloadFiles.action
select "Ubuntu 8.04 LTS" and download the stable version.
Extract the files.
Open a terminal and go inside the directory you just created and run ./vinstall
Now download a new xorg.conf file from: https://wiki.ubuntu.com/LaptopTestingTeam/HP2133?action=AttachFile&do=get&target=xorg.conf
Rename your existing xorg.conf file to xorg.conf.old and replace the original one with the one you just downloaded.
To restart the X server press 'CTRL + ALT + Backspace'
If all is well relax and enjoy. Otherwise:
Edit xorg.conf.
change the PanelID value in "Device" section of xorg.conf. Correct PanelID value for 1024x600 is 17 (Add line 'option "PanelID" "17"')
Wednesday, April 15, 2009
How to update the BIOS of an Asus EEE pc

Download the latest driver from:
https://www.asus.com/uk/supportonly/Eee%20PC%201000Linux/HelpDesk_BIOS/
Rename the file to 1000.ROM or 1005P.ROM or any number that matches your Eee PC and copy that to a FAT 32 USB stick.
Start up with the USB stick inserted and hold both ALT and F2 keys pressed during startup of the Eee PC and the BIOS update will run. The screen will show the update process.
Monday, June 04, 2007
Siemens gigaset WLAN camera Security problem
The Siemens gigaset WLAN camera has a big security problem.
Telnet and FTP, port 23 and 21, are completely open to this camera. Anyone can connect to yourcameraIP:23 with a telnet client as root and access the linux router running in the camera without even the need for a single password.
On connecting the camera returns:
Linux 2.4.19-uc1 (SI4e7141) (ttyp0)
SI4e7141 login: root
Welcome to
_ ____
____ ____ __| |___ ____ _ _ \ /
/ __]___ \/ _ | _ \| __ \| | | ||\\//|
| (__( (_) )(_) |(_)_) | | | |_| ||//\\|
\____]\___/\___/\____]_| |_|\____| /__\
Embedded Linux Solutions
For further information see:
http://www.cadenux.com/web/bsp
BusyBox v0.60.3 (2005.08.22-11:11+0000) Built-in shell (msh)
Enter 'help' for a list of built-in commands.
help does not work.
# help
help: not found
#
Possible commands are:
cat
cd
date
df
du
echo
exit
free
hostname
ifconfig
kill
killall
ls
lsmod
mount
nslookup
ping
ps
pwd
reboot
route
set
uptime
whoami
The password of the wireless network is then clearly revealed in a 'file' and open to any visitor who has the capability to use a Linux terminal. Read the 'password file' with the cat command.
No password needed. Ever.
It seems Siemens has no clue about network security. Siemens has no firmware upgrade even though adding a secret password to user root is essential for this to be a usable and save product. Be warned, don't use this camera without adding a firewall.
Telnet and FTP, port 23 and 21, are completely open to this camera. Anyone can connect to yourcameraIP:23 with a telnet client as root and access the linux router running in the camera without even the need for a single password.
On connecting the camera returns:
Linux 2.4.19-uc1 (SI4e7141) (ttyp0)
SI4e7141 login: root
Welcome to
_ ____
____ ____ __| |___ ____ _ _ \ /
/ __]___ \/ _ | _ \| __ \| | | ||\\//|
| (__( (_) )(_) |(_)_) | | | |_| ||//\\|
\____]\___/\___/\____]_| |_|\____| /__\
Embedded Linux Solutions
For further information see:
http://www.cadenux.com/web/bsp
BusyBox v0.60.3 (2005.08.22-11:11+0000) Built-in shell (msh)
Enter 'help' for a list of built-in commands.
help does not work.
# help
help: not found
#
Possible commands are:
cat
cd
date
df
du
echo
exit
free
hostname
ifconfig
kill
killall
ls
lsmod
mount
nslookup
ping
ps
pwd
reboot
route
set
uptime
whoami
The password of the wireless network is then clearly revealed in a 'file' and open to any visitor who has the capability to use a Linux terminal. Read the 'password file' with the cat command.
No password needed. Ever.
It seems Siemens has no clue about network security. Siemens has no firmware upgrade even though adding a secret password to user root is essential for this to be a usable and save product. Be warned, don't use this camera without adding a firewall.
Monday, April 10, 2006
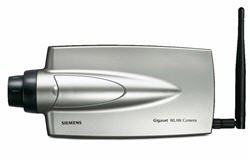
Siemens gigaset WLAN camera

The Siemens gigaset WLAN camera and its hidden features.
This is not in the manual.
This IP WLAN camera comes with Windows software and can be viewed with internet explorer together with active X.
If you need to the stream can be picked up by any application that can handle .ASF streams.
The stream is found at:
http://-your url-/img/video.asf
With this URL you can watch the camera with many mediaplayers that can open the .ASF format like WinAmp and Windows Media Player even if you are not using Windows.
To make the stream available over the internet and inside the LAN via a router, use an extra port besides port 80. For instance use extra port 1080.
In the router add a port foreward from 1080 to -IP-camera-:1080.
Inside the LAN look at port 80, outside the LAN via the internet, look at port 1080.
Check the article about a security problem with this camera.
Subscribe to:
Posts (Atom)